|
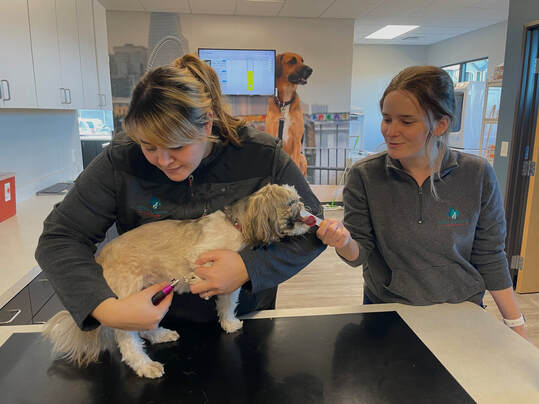
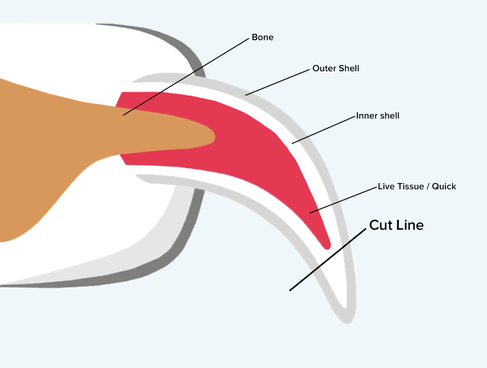
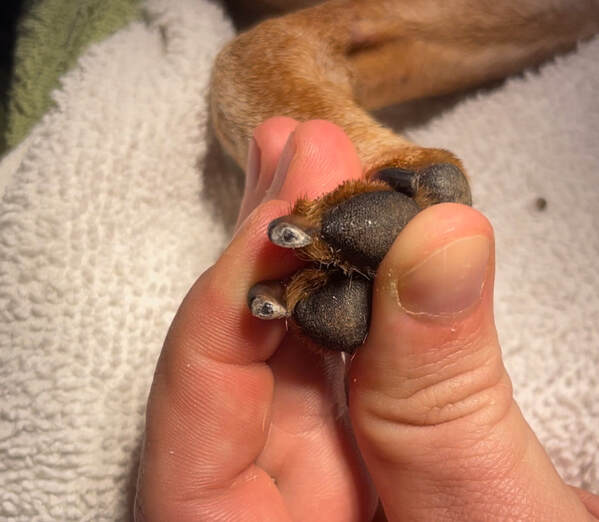
One of the biggest questions I get from new puppy owners is “how do I trim their nails?” while seasoned dog owners ask “Will you trim their nails for us?”. I can’t blame those seasoned dog owners! Nail trimming is absolutely the most hated grooming necessity among all dogs and owners alike. However, it does not need to be a battle every time your pet needs a nail trim; it’s just going to take some time and a lot of patience. I’m going to share some tips and tricks on how to train your dog to tolerate nail trims and also go over how to properly trim the nails. Step 1: Desensitize paw touching in your pet You’ll want your pet to first allow you to pick up their paw and individually inspect their toenails. Some dogs will allow this without any training, others will immediately pull away as soon as the toes are touched. Start by petting your dog in a spot you know they enjoy (head, back, butt scratches). After a few seconds of that, slowly move your hand to your pet’s shoulder or thigh without breaking contact with their skin. Then, move down your pet’s leg until you reach the paw. If they are still doing well at this point, you can pick up the paw. Be careful not to pull their foot outward away from their body as this can be uncomfortable for them. Instead, try to keep their shoulder or thigh in its current position and just curve the paw backward like the motion your dog would make if it were digging. At this point, your dog’s paw pads should be facing the ceiling. Then, try touching the toes individually. If at any point in this exercise, your dog starts to pull away, give them a break and try again with a delicious distraction such as spray cheese, peanut butter, a Lickety Stik- something tasty that will keep them occupied for a short period of time! If you don’t have a helper, you can spread the treat on the side of a shower or tub for easy clean up after. If your dog shows any signs of aggression (growling, snapping, barking, ears pinned back) or signs of overt distress (panting, yawning, drooling, trembling) discontinue the exercise and consult with your veterinarian for you and your pet’s safety Another way to desensitize paw touching is to teach your pet to offer their paw to you! This trick is given many names such as “give paw”, “shake”, or “high five”. It’s important to note that while training your pet any tricks, they must learn the behavior first before they learn the command name. My favorite way to teach this trick is by putting a delicious smelling treat in the palm of my hand and make a fist so my dog can’t eat or see the treat. I hold my fist out at a level they can reach with their paw with my wrist facing upward. Then, I allow them to inspect it. Usually they’ll start sniffing, then maybe whining and giving me puppy dog eyes, but if you hold out long enough, most dogs will start to paw at your hand to try and get it to open. The second my dog’s paw hits my hand, I open my fist and reveal the treat. This is repeated over and over again until your dog’s first instinct is to paw your hand instead of sniffing or whining at it. Once your pet is giving you the action consistently, only then do you say your command of choice once (“give paw”, “shake”, “high five”), and hold out your fist again. Repeat this over and over. With time, you can remove the treat from your hand and reward them following the action. Step 2: Desensitize your pet to the sight and sound of the nail trim device The most common way to trim a dog’s nails is with nail clippers. They work like pliers and make a flat cut across the entire toenail. The upsides: they are quick, make very little noise, and are pretty straightforward on how to use them. The downsides: the edges of your dog’s nails can still feel sharp for a couple days after trimming and if used incorrectly, you can cut or squeeze your dog’s quick which leads to pain and bleeding of the toenail. If you choose to use nail clippers, make sure they are the appropriate size for your dog, clean, and have sharp blades. Another option is to use a dremel which files the nails down. The upsides: the nails are smooth directly after trimming and it’s much more difficult to damage your dog’s quick. The downsides: they are loud, produce nail dust in the air, can catch the hair on furry paws, and have a bit of a learning curve to get the correct grip and use down. Once you have chosen which method you feel comfortable using, you need to make sure your pet is comfortable with the sight of them. Bring the nail trimmer or dremel out (do NOT turn the dremel on) and give your dog lots of pets and treats. You may be doing this step for days or weeks before you move on to the next if your pet is already afraid of nail trims. The next step is extending the tool towards them without touching them. Again, lots of praise and treats! Then, try touching the tool to their paw. If at any point your pet is uncomfortable, start back at the previous step for a longer period before trying to move forward. If you are using the dremel, you’ll need to repeat all of these steps one more time with the dremel on. Step 3: Trim your pet’s nails! First, let’s go over the anatomy of your pet’s nails. The outer casing of the toenails are made up of a protein called keratin, just like our nails and hair. This is what gives the toenail the hard protective shell. Within that shell is what is known as your dog’s quick. The quick is a cuticle that contains blood vessels and nerves. If your dog has white toenails, you may be able to see the quick - it’s pink in color. Because of the nerves and vessels, if you trim too close to the quick, you can cause pain and your pet may bleed. Within the quick, is an itty bitty bone. The goal of the nail trim is to only trim the overgrown outer keratin layer of the nail and to avoid the quick and most definitely the bone. When you are first training your pet to tolerate nail trims, it’s important to focus on the very tip of the nail. While your long-term goal may be to get your dog’s nails much shorter, we need to allow them to get used to the feeling and sounds of the nail trims first. Plus, you are much less likely to cause pain by focusing on the very tip. If your pet experiences any damage to their quick, it’s going to cause a substantial setback in your training. For some pets, you may only be able to trim one or two nails a day in the beginning. Allow them to dictate how much they tolerate - forcing them to do something they don’t want to is only going to make matters worse in the long run. If you are using the nail clippers, starting at the tip of the nail, trim a small sliver at a time. If your dog has white nails and you can typically see the quick, stop trimming 3-4 millimeters before you reach the quick. Even if you don’t cut the quick, trimming too close can squeeze it and still elicit a pain response. If your dog has black or dark pigmented nails and you can’t see the quick, inspect the cut surface of the nail after each sliver you take off, and when it starts to look like you cut into the tip of a jellybean, you’re done! You’ll understand once you see it - the center of the cut surface will have a wet look to it like you’d expect to see in the middle of a jellybean [pictured below]. Remember, take tiny amounts at a time! If you accidentally cut your dog’s quick and the nail starts bleeding, you can use styptic powder (also known as Kwick Stop) or cornstarch to stop it. You may need to apply pressure for 1 to 2 minutes. If you are using a dremel to perform the trim, hold the top ⅓ of the dremel handle between your thumb and pointer finger and wrap your fingers around the handle but keep your thumb sticking outward. Brace your thumb on the paw you are trimming. This will ensure that if your pet moves their foot, you and the dremel move with it. Use the dremel to smooth the pointed tip of the nail. Do not keep the dremel in one spot for too long, use small motions and check in to ensure you aren’t too close to the quick. Other information to note:
On average, dogs need their nails trimmed about once a month. Dogs who run on pavement will naturally file their toenails down and typically require less frequent nail trims. It is also normal for your dog to naturally file the toenails on the back paws more than the front - so some dogs only need the back paws done with every other nail trim. If you are unable to cut your dog’s nails very short because the quicks are so long, it is best to perform nail trims every 2 weeks. It will take time (months to years), but with frequent nail trims the quick will start to recede back and you’ll be able to get your pet’s nails shorter. There used to be a popular procedure performed at vet clinics called a “radical nail trim” or “show nail trim”. It is when the pet is under anesthesia and the nail is cut purposefully through the quick to make them very short and recede the quick back immediately. This is a dangerous and unethical procedure and I would never recommend any one putting their pet through this. If your dog absolutely hates nail trims and it stresses them out, we often will try training and trimming with anti-anxiety and mild sedative medications. The most popular medications used are gabapentin and trazodone. If your dog is still extremely uncomfortable despite getting the anti-anxiety medications, then we may need to look at using a stronger sedation protocol. Some dogs are not going to tolerate nail trims with clippers or dremels, no matter how much time and effort you put into training. For those animals, I recommend training them to use a scratchboard. A scratchboard is a board with sandpaper affixed to it. Dogs can be trained to scratch at the board which files their nails down. There is a Facebook group that has a ton of great information and resources on nail trimming. It is called Nail Maintenance for Dogs. It is a private group so you will have to request access before you can see all the posted information. Happy trimming! Please reach out if you have any specific questions about trimming your dog’s nails.
1 Comment
5/7/2024 02:33:36 am
Guaranteeing the wellbeing and joy of our pets requires devotion and information. By focusing on appropriate nourishment, customary activity, veterinary consideration, prepping, and stress the board, we can furnish our fuzzy companions with the most ideal personal satisfaction.
Reply
Leave a Reply. |
Topics
All
AuthorDr. Siri Horsley is a veterinarian and co-founder of City Limits Vet Clinic. She started the blog, From the Dogtor's Desk, to help provide pet owners with helpful information about vet care and their pets in general. Archives |
|
Find Us
8715 W Parmer Lane Building 2, Suite 110 Austin, TX 78729 *In the same building as Advanced Smiles Dental* |
Site powered by Weebly. Managed by IDEXX Laboratories


 RSS Feed

